Click to go to back to www.131mirafiori.com Welcome, Guest. Please login or register.
April 26, 2024, 02:12:29 PM
Home Help Login Register

+  131mirafiori forum
|-+  131mirafiori home
| |-+  General discussion (Moderator: Admin)
| | |-+  Rust proofing my 131
« previous next »
Pages: [1] Go Down Print
Author Topic: Rust proofing my 131  (Read 9023 times)
kev131
Founding Member
Hero Member
****
Offline Offline

Posts: 3,923


« on: December 22, 2006, 01:23:55 PM »

Well the day is fast approaching for this task and the stripping began yesterday. I'm not a mechanic nor do I have much experience of stripping...cars... so the power screw driver is being used selectively.

Whats gone well :
  • Sport trim and rear arches.
    Boot lining and rubbers.
    C pillars
    Passenger door linings.
    Rear seat
    Sill covers
    Finding additional access holes from the previous dinitrol treatment that will make the job easier.

Whats not gone so well:
  • Front arches (seem to be secured somewhere that I cant access and after reattaching one it does not line up exactly with the front spoiler.
    One screw from each cill cover has stripped some carpet as it unscrewed.
    Trying to remove the wheel arch liners - The fixings look that they may not reattach if removed.

Overall the car still seems rust free despite this most intimate (and almost gynacological) examination. The interior of the doors seems to have been lined with black plastic and the speakers covered in clear plastic - Dosnt look standard - More like a fastidious first owner.

We hope to perform the work on two days over the Xmas break with 6 litres of Dinitrol at ?90.00. I'll take some photos of progress and post them later on.

Hope everyone has a good Christmas.

Kev
Logged

Kevin Doyle
Fiat 131 Mirafiori Sport 2000TC
Fiat 131 Supermirafiori S3 2000TC
Limerick, Ireland
jseabolt
Sr. Member
***
Offline Offline

Posts: 89


WWW
« Reply #1 on: December 24, 2006, 12:11:18 PM »

After I painted my Spider back in 98 I mixed up a mixture of parafin wax (canning wax), mineral spirits and mineral oil and pulled out all the plugs and shot this stuff using one of those pump sprayers. I also sprayed inside the boot where I thought water might settle.

Some of my UK X 1/9 friends talked about this stuff called Waxoyl. I considered buying a gallon of it at Halfords but didn't think I could get it on the plane so I didn't bother with it.
I think I've seen it in some MG/Triumph parts catalogs so it is available in the United States.

This car sits inside a garage when not driven so it's dry the majority of the time. I suppose that's the best rust prevention. If you can keep one out of the weather.

I've had no problems with rust coming back. One thing I did was seal up all the cracks were the rear wheelwells are spot welded together. Water is notorious for getting trapped in these areas on 124 Spiders and rusting from the inside out. I didn't see such a thing on my 131.

My 131 came from the north where road salt is used more frequently so it had some issues. I vacuumed out several pounds of rust and I used several quarts of Eastwood's rust encapsulator and fiberglass on that car.

The car seems structurally OK but it was basically a rescue car.

I'm hoping by keeping this car garaged when not in use the fiberglass repairs should hold up.
Logged

1968 Ford Fairlane 500 (302 automatic)
1980 Fiat 131 Brava  (2000 automatic)
1980 Fiat 124 Spider (2000 turbocharged)
1987 Yugo GV (1500 turbocharged)
1981 Trabant 601
2003 Subaru Baja
Kennedy of Sixmilebridge
Hero Member
****
Offline Offline

Posts: 205

all-italia.net


WWW
« Reply #2 on: December 24, 2006, 09:03:40 PM »

We hope to perform the work on two days over the Xmas break with 6 litres of Dinitrol
For your info., Gentlemen,
Dinitrol is used by Boeing and Airbus, including use on the the prototype A380 double decker aircraft.
It also works quite well at protecting cars against the evil tinworm.
It is the standard to beat for all water displacing corrosion protection systems.
When it is impractial to galvanise a metal object against environmental effects, the next best thing solution would normally be painting and a coating of Dinitrol. 
Logged

all-italia.net
kev131
Founding Member
Hero Member
****
Offline Offline

Posts: 3,923


« Reply #3 on: December 30, 2006, 07:49:03 PM »

This unpleasant task is finished after 2 days of dirty, smelly and arduous work.

The rust proofing work itself was carried out by Gerry Kennedy (seen below and wearing specialized protective head gear) who has performed the Dinitrol treatment on upwards of a dozen cars, mainly 131s and 132s so there isnt a crevice or an access point that he dosn't know about on these cars!


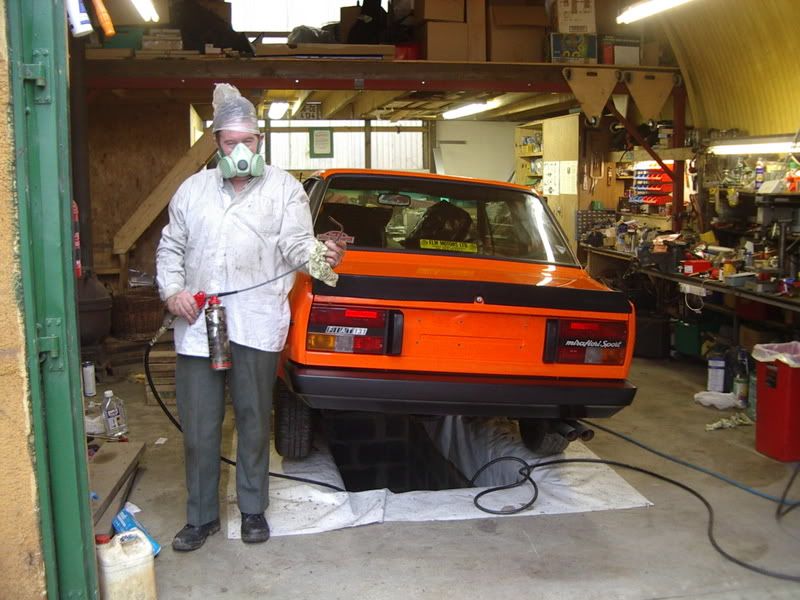
Preparation : As mentioned above some of the exterior trim, wheel arch liners and rear seats were removed. All other fabric was covered over with protective plastic. The car was then left in the workshop heated by a wood stove for 3 days to ensure that it was perfectly dry. (No point in rust proofing a damp or wet car as it only traps in the moisture).

As the workshop belonged to a generous neightbour and knowing that the job was a bit dirty I went looking for a large sheet of plastic. B&Q came up trumps with an obsolete "20% off all power tools" plastic banner which covered the ground under and around the Fiat. An oblong hole cut in the middle allowed access to the pit.

We also has access to an air line which allowed us to dry clean the underbody and wheel arches before spraying.

The job : Gerry started with the underside of the boot lid and my heart sank when I saw the dark streaks and splatters of gunk ruining my polished paintwork. This stuff gets everywhere especially when it is being propelled by compressed air.

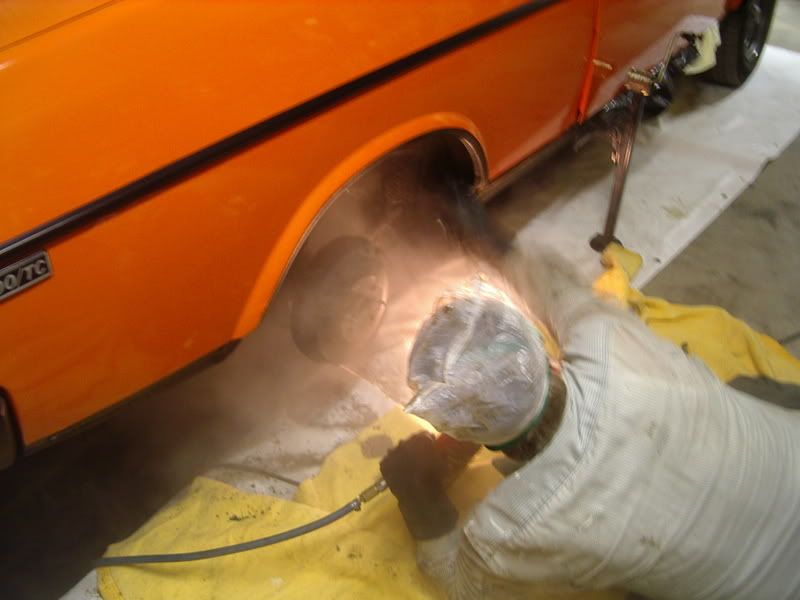
After that all 4 wheels were removed and each arch carefully coated, each arch took at least 3 attempts to ensure complete coverage as it is very difficult to see the surface while sprating.


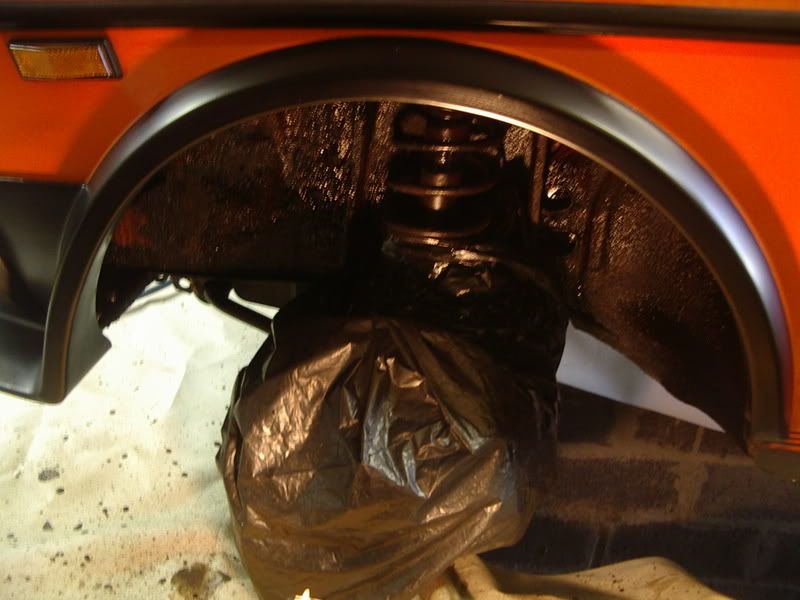
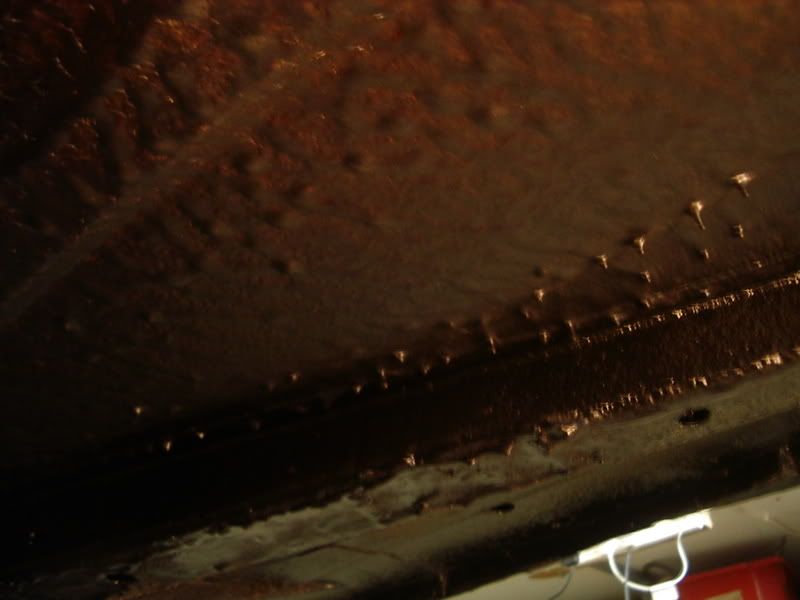
Here is a photo of a finished wheel arch.


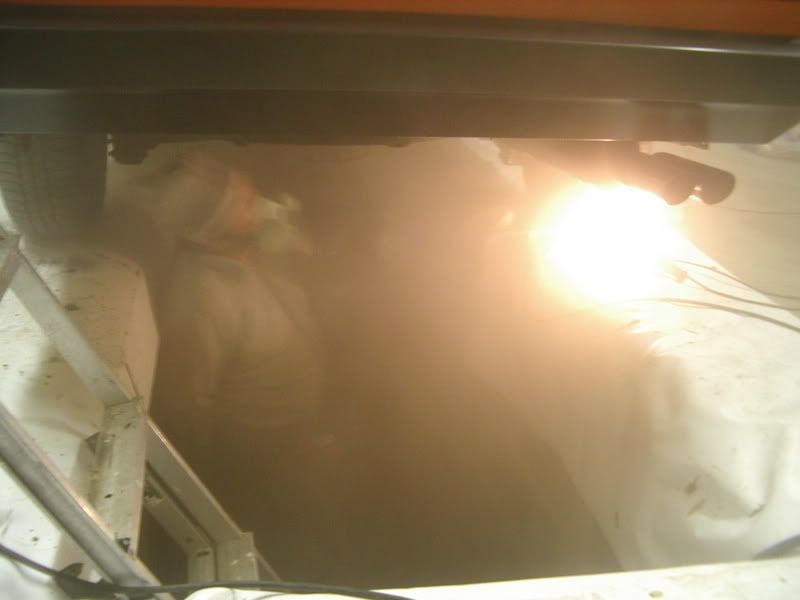
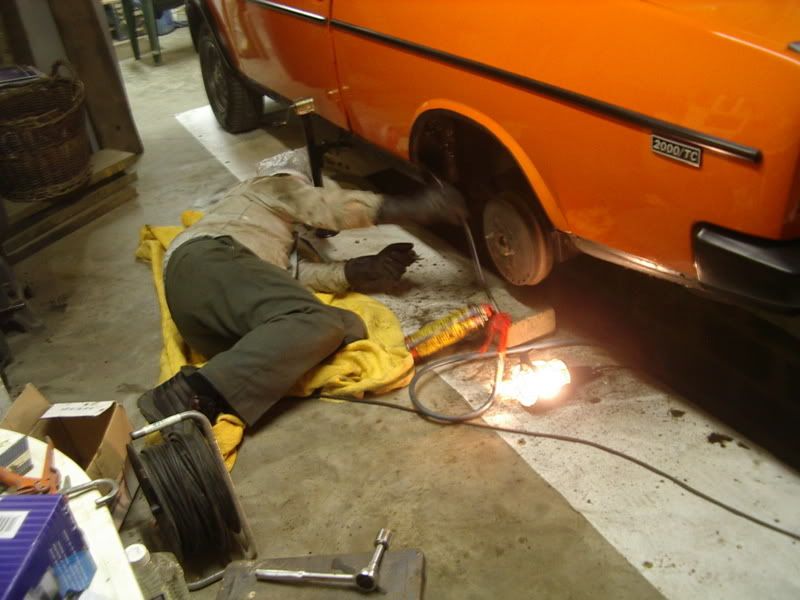
Next Gerry worked on the floor and the following image show what an unpleasant environment it is for the sprayer. Look hard for Gerry - He's there somewhere!


This shot shows some of the original rust treatment from 1985 (still in very good condition) and wet areas showing progress.


Next job was to change the nozzle for one that produces a ball of spray - Suitable for cavities and box sections. Access points for the cills were found behind grommets in the rear arches. You cant see the spray but you can see the leakage from various holes in the body to indicate that the hose is doing it's job.


The doors were treated in a similar way as was the rear roof section gained via an opening above the rear vent in the C pillar.

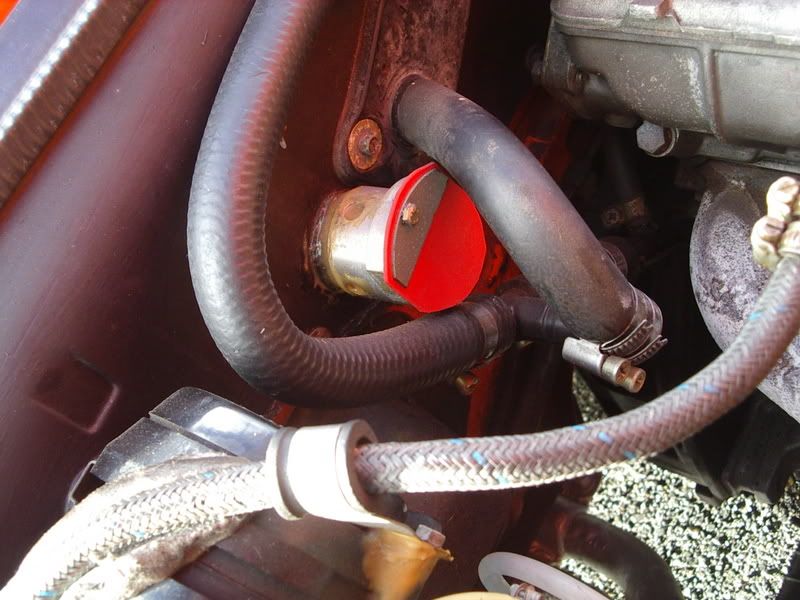
Our biggest challenge was how to access behind the firewall to treat the panel at the base of the windscreen. Neither of us really wanted to strip down this area but then we noticed 2 non standard aluminium pipes emanating from the bulkhead. This is the RHS one and it appears that the original owner had the foresight to make permanent apertures for repeat treatment. Job done in minutes with no trouble!? Grin


With all the main areas done we went hunting for additional access points. The door operated interior light switch was removed allowing access upwards and downwards. Additional non standrad grommets were found in the inner wings and they received a blast each. We finished with the underside of the bonnet - Every hole in which got the treatment.

Thats most of the account. Would I do it again? I hope never to have to. Even Gerry who does this job out of a love for classic Fiats restricts himself to one or two a year. The job itself can be quite dangerous and apparently inhaled fumes have killed several unwitting users in the past.

Did we do a thorough job? We didn't strip the roof lining or door cards (instead we unpopped them and peeled them away from the door) but felt that as the fact that the car has no rust, the previous owner clearly was very thorough the last time, this combined with the fact that the car is unlikely to see any rainfall (fingers crossed for 3MA? Wink) we are quite happy with the extent of protection applied. Gerry's son who is an Aircraft maintenance engineer whose job it is to know these things also endorses Dinitrol.

What did the car look like afterwards? One of the results of the application method is that a fine mist of Dinitrol is created which initially rises and then settles over everything - Everything and everywhere. The rivers of grease and gunk that leaked from the car resembled bleeding wounds - I consoled myself with the thought that wounds heal, the cancer of rust can be terminal!? Shocked

Next day was completely devoted to getting the car back to normal, 2 hours washing off the grease, another 2 putting back all the trim and the next 2 using the Autoglym products. The car is back to looking pristine again and very much looking forward to it's new set of alloys next month.

After that it is a brake overhaul and NCT test in advance of it's trip around Munster.? Cheesy

Thanks very much to Gerry and Kennedy of 6milebridge for help and advice on getting to this stage. I hope the account has been reasonably interesting to readers.

Tips if I was doing it again! Strip as much as you can beforehand, cover what ever is left almost as if you were masking before a paint job, cover the surfaces not being treated (roof, engine, etc), make sure that you have a good breathing mask and excellent working conditions...and ask Gerry to do the job for you - You wont get a more committed and conscientious worker for this job!
Logged

Kevin Doyle
Fiat 131 Mirafiori Sport 2000TC
Fiat 131 Supermirafiori S3 2000TC
Limerick, Ireland
Kennedy of Sixmilebridge
Hero Member
****
Offline Offline

Posts: 205

all-italia.net


WWW
« Reply #4 on: January 02, 2007, 06:32:48 PM »

Don't forget to repeat the process in the year 2027....

Seriously though, the Dinitrol layer should be visually checked for damage and ageing effects and touched up, (only if necessary) by hand, ideally at the end of the show season.
A good point in time each year is when a car is being garaged up / stored for the winter.

Logged

all-italia.net
Pages: [1] Go Up Print 
« previous next »
Jump to:  


Disclaimer: This forum is available free and is part of a non-profit website run by volunteers for the benefit of owners and enthusiasts of the various models of the Fiat 131 and derivatives. Information is provided in good faith and no liability can be accepted by any individual for any situation arising from the use of this information.

Opinions expressed in this forum are those of the contributors and not of the website's owners, administrators or moderators who cannot accept any responsibility for the results of following any advice given by contributors.

The administrators and moderators of this forum reserve the right to edit or delete anything they consider to be of a defamatory, discriminatory, derogatory, abusive or otherwise unacceptable nature.


Powered by SMF 1.1.21 | SMF © 2015, Simple Machines

Click to visit www.thotos.com